Tuesday, 15 September 2020

Sunday, 24 November 2019
3D Animation 2 - Lip Sync Group Assignment
What worked?
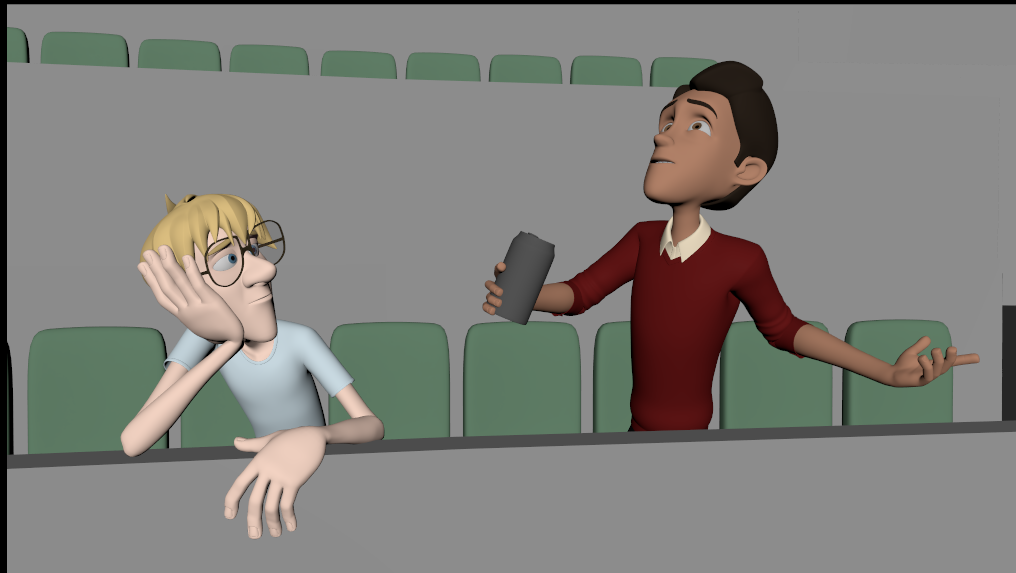
Me and Kevin were able to work together to create different
personalities and characteristics between the two characters interacting such
as the colour of clothing they would wearing or, instead of Malcolm just
sitting there, he would do small things like looking around to show that he is
having his own thoughts and conversation with himself.
 In my second shot when Malcolm is shocked, instead of him
looking at Jerry, I thought I would try having him move his glasses a bit
because I wanted to show a bit more of his personality and character.
In my second shot when Malcolm is shocked, instead of him
looking at Jerry, I thought I would try having him move his glasses a bit
because I wanted to show a bit more of his personality and character.
When I am animating, I like to exaggerate a lot while Kevin
goes for more subtle and small movement. So, me and Kevin tried to find a
common ground so when transitioning to the other person’s shot, it would look
the similar. I would not exaggerate as much on the poses while Kevin would work
on more exaggerations and adding arcs to his animation part.
What didn’t worked?
 There were still some parts of my animations that I think
did not need as much exaggerations, such as when Jerry says, ‘…America’s PAST
TIME.’ He would rise up with his arms in the air. This in my opinion is a bit
too much movement and exaggeration and does not match the tone or the audio.
There were still some parts of my animations that I think
did not need as much exaggerations, such as when Jerry says, ‘…America’s PAST
TIME.’ He would rise up with his arms in the air. This in my opinion is a bit
too much movement and exaggeration and does not match the tone or the audio.
What me and Kevin did in order to give each other feedback
was every Sunday we give each other feedback and updates on how our animation
is going. Whenever, I give feedback to Kevin, majority of the time, it’s the exact
same feedback I give, ‘character whole body is frozen except hands’ or ‘arms is
too straight’, he rarely applies the feedback I give him to his animation.
In my final shot, Malcolm’s hands and arms, its looks too flowy
because of the size of Malcolm hands as well as I add too much animation into
his movement than necessary.
What to improve?
What I would improve is experiment more on camera shots so
one person is on screen instead of two so both character can have the same
detail in animations than having two characters on screen and applying more
detail to one character than the other. Also, I would also have made a new reference
so both the gesturing and the audio of the lip sync makes more sense.
Final Playblast (My Part)
Sunday, 15 September 2019
3D Animation 2 - Pantomime

What worked?
From my previous animations, I was not able to fully apply
arcs within my animation because I did not know how to create or produce the
arcs in the first place. What I ended up doing was using ‘SyncSketch’ and
drawing lines and guides so I can get a better understanding of the position of
the arcs and what the new animation would look like if I used my guides.
 During my portfolio presentation, Simon gave me some
feedback on the movement of the character’s eyes. He said that a person does
not roll their eyes around, they dart meaning the eyes snap looking from one
object to another object. This did improve on the parts of the animation such
as when the character sees the guns and instead of the eyes slowly rolling, the
eyes dart from one gun to another. In addition, Rose also mentioned that eye
brows and eye lids also move along with the eye, which adds extra detail to the
eye movement.
During my portfolio presentation, Simon gave me some
feedback on the movement of the character’s eyes. He said that a person does
not roll their eyes around, they dart meaning the eyes snap looking from one
object to another object. This did improve on the parts of the animation such
as when the character sees the guns and instead of the eyes slowly rolling, the
eyes dart from one gun to another. In addition, Rose also mentioned that eye
brows and eye lids also move along with the eye, which adds extra detail to the
eye movement.
What didn’t work?
Comparing my reference and my animation, the way the
character sneak walks towards the diamond is different. I initially wanted the
character to have a bit of a bounce similar to my reference so she has a bit of
a personality as if she is happy to have found the diamond. However, I was not
able to apply this to my animation and it ended up being a simple sneak walk
towards the diamond.

Before the character grabs the diamond, she does a little
hand gesture. In my reference, I was able to see the fingers move fluently
however, when applied to my animation frame by frame, it’s very quick so I
tried to delay the time, but it still had the same result.
What could be improved?
I would improve on how to animate hair because while there
are some parts of the hair animation I am happy with, other parts do not have
the same detail compared to another part. I initially went frame by frame on
one hair control and changed direction opposite of when the head turns. This ended
up making it difficult when applying weight and overlapping since the keys are
in difference places in the timeline.
Furthermore, I would improve on the uses of squash and
stretch. It did help with adding exaggeration to expressions such as
accomplishment and being shocked but the way I used them did not work well with
the way I animate.


Final Playblast
Sunday, 16 June 2019
3D Animation 2 - Parkour Group Assignment
 This was the very first assignment that we are working with a teammate and I was kind of sceptical since I prefer to work alone because if there is a mistake or something is behind schedule, I know it’s my fault, but when working with someone, sometimes you either have to wait for them or they have to wait for you. I knew it was going to be a challenge especially working with another person but all in all, this was an interesting experience.
What worked?
 While my animation looked like she is stomping away and having a tantrum, Isk animation look like she was jogging like nothing was chasing her. We ended up asking someone to redo our reference so we can compare our mistakes and errors. When I animate, I look at my reference and immediately exaggerate my key poses while Isk find reference, replicates it and exaggerates later.
 We were able to communicate, give each other feedback and find a common ground and compared our work so we don’t go over the top with our styles, such as I tried to constraint how much I stretch my poses and arcs while Isk added more arcs and stretch to his animation. We also, divided the work load so Isk finds/models building for our layout and I texture the layout.
Chris’ feedback on the cyborg jumping down and cuts to the girl already scared and shocked helped a lot when showing the impact and cut from the girl think the cyborg is gone to her reacting when the cyborg lands. Also, his animation had some stretch which me and Isk applied to our animations.
Another thing that worked was the ending shot when to girl leaves, it is more realistic. While working on it, I didn’t really have any reference because me and Isk initially wanted an ending where to cyborg gives the wallet back.
The feedback I got for the last shot was to get reference and when recording the reference, I realised that I needed to change the anticipating pose completely since its more cartoonish and also, I used my left leg to anticipate back instead of my right leg.
What didn’t work?
In my animation, the cyborg has more detail compared to the girl. I was more focused on the cyborg since they are on screen the most compared to the girl that I needed to fixed a lot of errors mainly on the girl. Also, the girl running does not show as much fear as I hoped, yes, she is running, but I do not see as much fear as I have hoped she would.
Timing on the reference could be better. Most of the time, I need to cut up my reference and change the speed when editing which shows that I am not really good at timing my reference to my animation.
What could be improved?
Another improved I would make is better communication with my teammate but not too much communication to the point I would seem annoying. Furthermore, cut out some of the parkour out so I do not have a lot to animate and find better references to work on timing.
All in all, this has been an interesting experience working with someone completely different on the style of animating and how you approach animating a scene.
Final Playblast (My Part)
Sunday, 7 April 2019
3D Animation 2 - Heavy Lift
What worked?
What worked while animating a heavy lift, was how I exaggerated the anticipation when the character is about to lift the object. In my reference, the anticipation is very subtle, so I added my own exaggeration from my reference to my animation.
Another thing that worked out was my camera movement. The feedback from my first camera movement was that it was too fast, so I slowed down the camera so the viewer barely notices the movement.

Anticipation

Upper Lift
What didn’t work?
What didn’t work however, was when the character carries the bucket, the arms either snap of move in random directions. I was able to fix most of the snapping issues, but I felt like the arm does not match how I lifted the bucket in my reference.
Also, when the character steps back to look at the other buckets, the overlapping I felt was either too fast or too slow around the left arm and the hips.

Carrying Bucket

Stepping Back
What lesson did you learned and what could be improved?
What I learned and I would improve on is there is subtle movement even when someone is standing still and bends down to put a heavy object and also, it is better to parent constraint on an object without problems when animating to a control that is barely moving or noticeable such as the tip of a pinky finger. work more on the arms and clean up on the overlapping when the character turns.
To improve, I would add more swaying to the bucket as the character carries it.
Final Playblast
Friday, 23 November 2018
3D Animation 2 - Walk Cycles and Jump
Basic Walk
What worked on this animation was that I was able to get the basic key frames for the hips and legs and slowly adding my own style to the walk. Even though the walk looks good, its not a normal walk and looks more happy than basic. If i were to go back and improve on the animation, I would move the hip translate too high or too low.
Personality Walk
When doing my personality walk, the
animating portion of the walk was pretty simple with the flow of animating the
hips and legs first then working my way up to the chest, then arms then head.
With the feedback I got, I only had to work on the speed of my walk and how the
arms are animated and overlapping.
Hips and Legs
Spine
Arms
What didn’t work was that I wanted to add a
more paranoid personality to my character. From my previous reference attempts,
it was more like she was cold than paranoid which was why I ended up doing a sneaky
walk instead. I also wanted to add head turning to make her look around the scene but since this is a cycle, it would look weird on the character.
What I want to improve on is my overlapping
on the arms and hands so it more fluent and also work more on the speed so it
does not stop when the walk is cycled. I would also like to add head turn so it
looks like she is looking around the scene while she is sneaking across the
hallway.
Some problems I had rendering out the
animation was that Bonnie had a few texturing issues such as pale skin having no eyes
and the hair being black as well as when viewing and animation in the maya
inter face and Arnold render, its normal however, when doing a render sequence,
her eyes and teeth clip out while the head stays back. To fix the textures, I replace
the blinn textures to aiStandardSurface and change the colour and style of
Bonnie completely. When it came to the render, I check Bonnie’s geometry and
notice that she had XY translate animation on the eyeball and mouth geos, so I
deleted them.


Final Personality Walk
Jump
The jump animation was initially supposed
to be a simple jump similar to my reference video, but I wanted to make it more
than just a simple jump on a box so, I found a few reference videos of people
parkouring off roofs. What worked in this animation was I was able to give the
character weight when she steps or jumps off the ledge of the building.
I wanted to add a running start to the
animation but ended up cutting it so the jump is more focused than the running
start. Also, I wanted to add a roll to the animation however, I was not
supposed to add turning or rolling in this assignment.
If i were to improve on this animation, I would add
my ideas mentioned before and add a bit more overlapping and anticipation
before she jumps off.
Final Jump
Friday, 14 September 2018
3D Animation 2 - Advanced Bouncing Ball
Planning
Originally, I had chosen a Hand Ball and a Golf Ball for the
animation. When given feedback in order to start my animation, I was told that
both the handball and golf ball bounce very simpler and was suggested using a
bowling ball with video reference.
While coming up with an idea for my animation, I simply
wanted to just do a simple bouncing ball animation with the robot arm I made in
first year as Rose suggested, however, when Rose said something along the lines
of ‘… you can’t stop a light ball mid bouncing…’ and then I thought ‘well you
can… you just need something to squash it.’ and then I had my story and asked
Rose if I can animate it. I also wanted to add animation to both the robot arm as well as the camera so it shows both the impact and the reaction of the robot to show character.

Animating the Hand Ball
The issues I had when animating the handball, was how it
stopped mid-air and basically made its own gravity. I was trying to make the
impression that when the ball bounces mid-air, then next frame would be the bowling
ball dropping down on top of it. It solve this issue, I made the arch in the
graph for the hand ball while, on the bowling ball, made it drop while the hand
ball was still making the arch. Since the audience does not see the ball
inside, I thought this was not really an issue.


Animating the Bowling Ball
Using the video reference provided, I was able to get a good
looking bowling ball animation, but, since the reference had a cloth as a
surface for the bowling ball to drop, this made my animation not correct with
the surface I’m working with. I only need to make it so the bowling ball rolled
a little longer and stopped slower and smoother. Instead of simply making the
bowling ball roll off the shot, I decided to challenge myself and see if I can
recreate the bowling ball tilting, this was surprisingly the most frustrating
as it kept looking incorrect.
All in all, although the animation looks a bit cartoony, I was
happy with the final result of my animation.
Saturday, 2 June 2018
Modelling - Journal 3 Sculpting Project
For this assignment, we were required to sculpt a muscular structure of the chosen animal in our group. My group went with bears which are part of the Ursidae family. For the sub-species of bear, we picked the Polar Bear, American Black Bear and Panda Bear which all have different features and body structures to help them survive in their habitat even though they are part of the same family.
Research

While doing research on the polar bear, I discovered that polar
bears have an elongated, narrow oval shaped skull and a long neck to aid them
in the water while warming the air that they breathe. Also, their large, flat,
oar-like front feet helps them swim in the water making them excellent
swimmers. Polar bear rib-cages are long and wide because they have a thick
layer of body fat which requires a bigger rib-cage. They also have a
water-repellent coat that protects them from the cold air and water.

American Black Bears are the smallest compared to the polar
bear and brown bear. They have a flat pointy skull as well as short,
non-retractable claws that help them climb trees. The rib-cage is smaller and
sharp-angled. Also, their spine is lower compared to the other bears due to the
second layer of protection between their skin and the fur. Even with that extra
layer, their body is designed to move extremely fast and climb trees.

Panda Bears or Giant Pandas are the smallest mammals in the
group. It has a similar skull shape contrast to the brown bear and American
black bear but the tip on the back of the skull is smaller and has a hook
instead of a round point. The giant pandas have an extra digit on their paw
that functions as a thumb to help them tear the bamboo off the ground. In
addition, they have strong broad jaws that help crush the bamboo easily and
their teeth are adapted to crush tough plants stems.
All in all, each bear all have different features and body
structures in order to help them survive in their environment. Polar Bears have
a narrow oval shaped skull and a long neck to help them swim in the water as
well as a thick water-repellent coat that protects them from the cold air and
water. American Black Bears have non-retractable claws that help them climb
trees and even though they have an extra layer of protection between their skin,
their body is built to move extremely fast. Finally, Giant Pandas have an extra
digit on their paw that functions as a thumb to help them tear bamboo and
strong jaws and teeth that helps them crush the bamboo easily.


Process
While doing research on the polar bear, I originally thought
of doing a stand up sculpt pose because it looks more dynamic and shows the
full length of the polar bear but when I trying to draw out my plan, I did not
know how to work with the bottom half of the reference; so, I ended up doing a
walking pose of my sculpt since it more simple and dynamic. For the drawing
process of my sculpt, I only wanted to draw shapes that are simple so I can
easily model them in Z-Brush. I also, used the reference image as a guide to
help me make a more accurate rough sculpt.

Once I had my finished drawing planned out, I started
getting a Z-Sphere in Z-brush and started making the skeleton of my sculpt. I
then used spheres and cylinders to add mass to the skeleton and define the bear
geometry more using simple shapes. For the shoulders and pelvis, I used a
sphere and the move tool to make it look more like a shoulder blade and pelvis
so, at the point where I need to Dyna-mesh the shapes, I don’t have to brush
the parts in. While doing this process, the goal for me was to use simple
shapes to define the animal and then once it is merged, I don’t have to create
lines that tell where body parts like the arms or legs are.

As I was about to create the muscles anatomy using the image
references as a guide, I got some feedback. One of them was that we are
modelling an animal with skin not the anatomy of the said animal which I did
not know about. The other feedback I got was that the animal my group has
selected does not show a lot of muscle due to the heavy coat bears have. The
suggestion was to make a separate layer; one for the animal to have the coat
and the other layer for the bear to have no coat, just the skin.
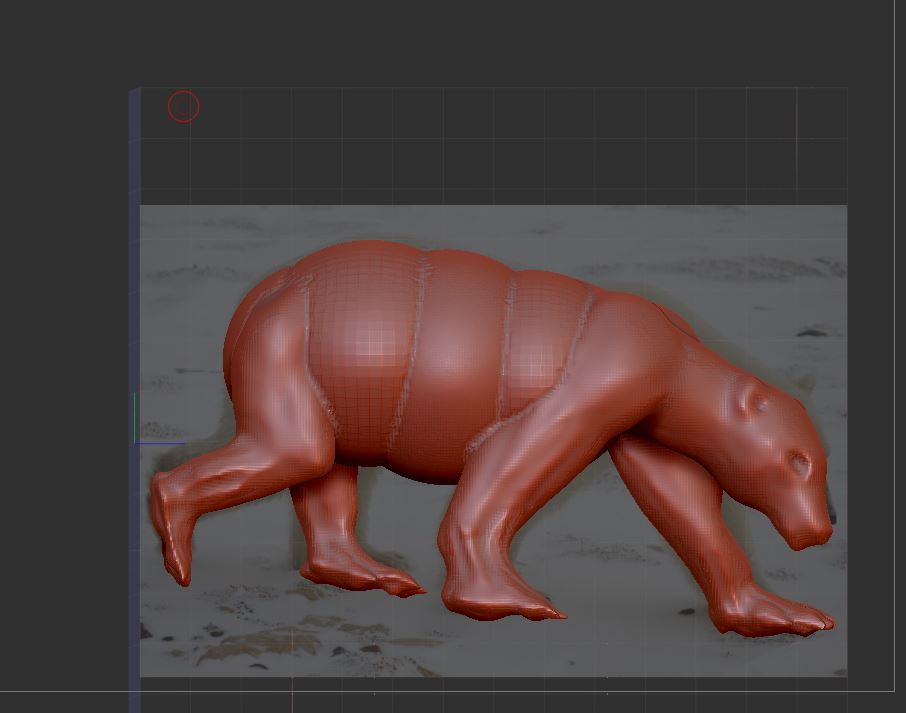
Once I’m happy with the sculpt, I now needed to make a separate
sculpt of the bear with the coat. I duplicated the model so I don’t have to
remodel the polar bear and rename the first model as ‘PolarBearNoCoat’ so I can
tell the difference and not get confused. I then used the same technique that I
used when making the mass of the bear which was using spheres and cylinders,
but since I only want to make the polar bear’s body to have a heavy coat, I
only used spheres. I then used the brush to add more mass to the arms, legs and
neck as well as, removing all the muscle detail I did on my previous sculpt. I
initially wanted to make fur on the model. So, I did an experiment to see how
it would looked and it did not look anything like fur. It looked more like bark
on a tree than fur so I scraped that idea and kept it simple.

The feedback I received was that my anatomy was very poor
especially for both the muscle as well as the legs which I agree with. I was
recommended to look at an anatomy book called ‘Science of Creature Design – Understanding
Animal Anatomy’ by Terryl Whitlatch and while going through this book, I found
a very good images of the muscle anatomy of a bear. So, instead of spending
hours changing the sculpt, I thought I should start over.

So with the anatomy book with me, I started making a new
skeleton for my sculpt. I also changed the scale of the image grid from 3 to 5
because, I work better on a bigger scale and also, I can add more detail to the
muscle if I wanted. I then started adding a head to the skeleton. Instead of
making a sphere head like I did on my previous attempt, I made an over shaped
head because on one of my reference images with the polar bear’s head close up,
its more wider and has an oval like shape. Furthermore, instead of sculpting
the ears, I made two cylinders with symmetry on and then started moving the
head to match my image reference. For the limbs, the goal was to make the
muscle structure using simple shapes like cylinder and then filling and
brushing over the shapes to create the actual muscle. This so I don’t have to
spend my time making indent from a certain part of the anatomy such as making
an indent from the arm to the shoulder.
 At this point I DynaMesh the model to 80 so the resolution isn’t
too big and then used the clay build up brush to make the muscle creases. I
also added indents for the eyes that I am going to clean up later. I then
started following the anatomy book recommended for me so I can add muscle
detail and change how the front limbs look like. I had to change how I made my
front feet because before it looked too big and human like similar to my last
attempt model. I did the same thing for the back legs and then smooth the
muscles because the brief asked for a sculpt of a muscular animal structure but
with the skin. After a little more cleaning up as well as fixing up the legs so
the connecting tissue from the leg to the body is present and connected, I
started adding more detail such as showing the ribcage, adding detail to the
head and adding nails to the paws of the model.
At this point I DynaMesh the model to 80 so the resolution isn’t
too big and then used the clay build up brush to make the muscle creases. I
also added indents for the eyes that I am going to clean up later. I then
started following the anatomy book recommended for me so I can add muscle
detail and change how the front limbs look like. I had to change how I made my
front feet because before it looked too big and human like similar to my last
attempt model. I did the same thing for the back legs and then smooth the
muscles because the brief asked for a sculpt of a muscular animal structure but
with the skin. After a little more cleaning up as well as fixing up the legs so
the connecting tissue from the leg to the body is present and connected, I
started adding more detail such as showing the ribcage, adding detail to the
head and adding nails to the paws of the model.
Now was time to add the coat to the model. I first duplicated
the model and used the quadfill brush to fill in more mass to the sculpt
because the polar bear has a heavy coat. The problem with using this method is
that the model starts to become to rectangular and no longer has its round shape
so, I had to both smooth and round the model until it looks like my image
reference and also, looks in proportion in all sides of the sculpt.
 The challenging thing about sculpting was that the only
reference I had on bear muscles were drawings. So, interpreting drawing into a
3D sculpted proved to be difficult especially the legs and head. But, with the
book recommended to me, this helped out a lot when sculpting the limbs.
Furthermore, the reference photo I’m using has the polar bear looking down, but
it is hard to determine if the head is either looking straight or angled
slightly. Throughout majority of the sculpting process was me looking at the
reference and visualising how to looks in a 3D space and seeing if it looks
right or not.
The challenging thing about sculpting was that the only
reference I had on bear muscles were drawings. So, interpreting drawing into a
3D sculpted proved to be difficult especially the legs and head. But, with the
book recommended to me, this helped out a lot when sculpting the limbs.
Furthermore, the reference photo I’m using has the polar bear looking down, but
it is hard to determine if the head is either looking straight or angled
slightly. Throughout majority of the sculpting process was me looking at the
reference and visualising how to looks in a 3D space and seeing if it looks
right or not. All in all, this has helped me improve on my understand of anatomy
as well as determine the right proportion on a model and using my knowledge of
anatomy to visualise and interpret a 2D image into a 3D object.
All in all, this has helped me improve on my understand of anatomy
as well as determine the right proportion on a model and using my knowledge of
anatomy to visualise and interpret a 2D image into a 3D object.Sunday, 15 April 2018
Modelling - Journal 2 Task 2 (King Spear Tip)
Attempt 1

 When I first saw the model, I thought maybe
if I just used a plane, I could not only extrude out the plane faces, I can
also have control on the amount of edges I use. The shape looks accurate
comparing it to the spear tip model and so I extruded out the plane to make it
3-Dimensional. I then deleted the faces that are bevelled inward because I
thought I could extrude and change the edges position to make a nice slope.
When I first saw the model, I thought maybe
if I just used a plane, I could not only extrude out the plane faces, I can
also have control on the amount of edges I use. The shape looks accurate
comparing it to the spear tip model and so I extruded out the plane to make it
3-Dimensional. I then deleted the faces that are bevelled inward because I
thought I could extrude and change the edges position to make a nice slope.When I was about to extrude though, I realised that while the front and side view looks the same, the model is actually a little round and not cubed. The top view is completely different from the spear tip top view. This would require me moving the vertices of the model and mess the model completely. What would be better is if I used a cylinder instead of a plane so I can keep the spear rounded on the top and bottom. Also, the plane does not provided depth which the spear tip model has. All in all, while this was able to maintain its shape from the front and the side, it does not from the top as well as not have any depth present.
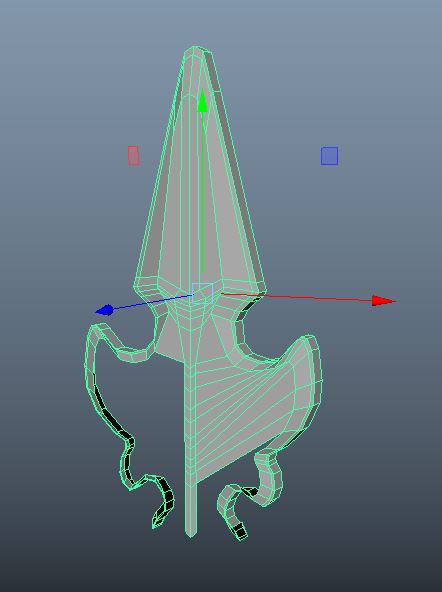
 For this attempt, I thought I could try
using the same method on my first attempt but make an outline of the side view.
The first attempt was too flat however, if I started on the side and work my
way inward, I can get the 3D aspect of the spear tip. I got a cylinder and
rotated it and begin with the very tip of the model because the spear tip has a
curved tip which looks like its curved over. I then deleted all but four faces
just to get only the outline of the tip of the spear. This is so later on, I can
just make the outline of the spear tip without worrying about making it 3-Dimensional
unlike my last attempt, I only focused on getting the shape of the tip accurate.
Once I got the outline of the spear tip, I started extruding inward.
Furthermore, I extruded down the middle so I can later on use the multi-cut
tool and make edges. The only issue with is technique is that the topology in
my opinion does not look right. If I want to add an extra edge around
an edge border, it will go around the whole model and make it too sharp compared
to the spear tip.
For this attempt, I thought I could try
using the same method on my first attempt but make an outline of the side view.
The first attempt was too flat however, if I started on the side and work my
way inward, I can get the 3D aspect of the spear tip. I got a cylinder and
rotated it and begin with the very tip of the model because the spear tip has a
curved tip which looks like its curved over. I then deleted all but four faces
just to get only the outline of the tip of the spear. This is so later on, I can
just make the outline of the spear tip without worrying about making it 3-Dimensional
unlike my last attempt, I only focused on getting the shape of the tip accurate.
Once I got the outline of the spear tip, I started extruding inward.
Furthermore, I extruded down the middle so I can later on use the multi-cut
tool and make edges. The only issue with is technique is that the topology in
my opinion does not look right. If I want to add an extra edge around
an edge border, it will go around the whole model and make it too sharp compared
to the spear tip. 
 I thought later on I can fix it later since
I want to mainly focus on getting the shape of the model correct. So, I then used
the bridge command to bridge two edges one by one while going down the model.
As I was bridging, I realised there are too many edges on certain points which make
the whole shape of the model. If I removed an edge loop, then the shape will be
distorted. This attempt while it got the 3D aspect of the spear tip, the topology
and methods I used were not good. While it was quick just to make an outline
and extrude in, the topology needed for other elements such as the rims and the
grooves were not presented well. In addition, on the side view, the spear does
not have any bevelling or depth compared to the spear tip model. For my next
attempt, I will use the cylinder again but not to make the outline. The reason
why I am using a cylinder again is because a cylinder is used as the base of
the spear tip.
I thought later on I can fix it later since
I want to mainly focus on getting the shape of the model correct. So, I then used
the bridge command to bridge two edges one by one while going down the model.
As I was bridging, I realised there are too many edges on certain points which make
the whole shape of the model. If I removed an edge loop, then the shape will be
distorted. This attempt while it got the 3D aspect of the spear tip, the topology
and methods I used were not good. While it was quick just to make an outline
and extrude in, the topology needed for other elements such as the rims and the
grooves were not presented well. In addition, on the side view, the spear does
not have any bevelling or depth compared to the spear tip model. For my next
attempt, I will use the cylinder again but not to make the outline. The reason
why I am using a cylinder again is because a cylinder is used as the base of
the spear tip. 
Attempt 3
 So as previously stated from my last
attempt, I will try using a cylinder to make the model since the spear tip has
a cylinder like base down up. I started by using the measurement tools and
implementing my measurements into the workspace. This is so I know the height and
distance between certain parts of the model and where they transit from one
part to the next in a nice slope. I got a cylinder with a sub-division of 12
and started extruding to match the image reference. Why I choose this technique
is so I can make the starting point on when the shape changes and extrude out.
There are 3 shapes I can already see, meaning 3 segments I need to extrude. I
then delete all faces leaving a quarter of the model so I can focus on one side
instead of trying to make all sides symmetrical. I then extrude the middle part
of the component and tried to keep in mind of the amount of edges in the model
so it’s does not end up causing pinching or small dents in the model. I start
off with the middle because it the biggest piece out of the 3 and also, it’s
the point where the spear tip starts to change.
So as previously stated from my last
attempt, I will try using a cylinder to make the model since the spear tip has
a cylinder like base down up. I started by using the measurement tools and
implementing my measurements into the workspace. This is so I know the height and
distance between certain parts of the model and where they transit from one
part to the next in a nice slope. I got a cylinder with a sub-division of 12
and started extruding to match the image reference. Why I choose this technique
is so I can make the starting point on when the shape changes and extrude out.
There are 3 shapes I can already see, meaning 3 segments I need to extrude. I
then delete all faces leaving a quarter of the model so I can focus on one side
instead of trying to make all sides symmetrical. I then extrude the middle part
of the component and tried to keep in mind of the amount of edges in the model
so it’s does not end up causing pinching or small dents in the model. I start
off with the middle because it the biggest piece out of the 3 and also, it’s
the point where the spear tip starts to change. 

I then repeat the same thing on the bottom curve of the spear tip since this technique worked well from the middle part of the spear tip. Also, this makes the topology of the model have a nice flow. I go back to the top of the component and extrude the faces again to have a nice topology on the model. The then extruded inward but only to make the groove around the top of the spear tip. I was considering to use Boolean just like the bishop model but I thought it was not necessary since this is not a difficult shape to model and while the groove has a little depth, the shape is just a triangle. I finally duplicated the model on the X scale and combine and merge vertices and then repeat for the z scale. Since I wanted that take a look at the finished mode, I need to duplicate all sides. The reason why I remove all by a quarter of the model is so I don’t have to remove the steps and waste time on the other 3 sides.
For the base, I used a cylinder with a
radius of 0.885 because when I measured the base radius, it was 0.885 and
started extruding down. I used the circle curve to set my measurements so I can
C-snap on the curve similar to when I did the base for the bishop model.

 This attempt while the shape is nice, is bottom
of the spear tip is has too many edges also, its pinching and is too sharp
compared to the spear tip where it is more smoother and no bevelling. The outer
rim from the middle and the bottom are too thin and sharp. There is no gradual
slope and it’s too sharp when there should be some roundness. The top also has
no gradual slope from the top of the spear tip to the middle. All in all, the
general shape is ok, but the rim and the groove do not look accurate to the
spear tip. What I should have done was break the model into 3 segments and
using different polygons for each segment. Also, instead of working in the
middle, I should have worked from the top down since the top requires more
edges then the middle and the bottom because the groove is sharp around the
outer edge.
This attempt while the shape is nice, is bottom
of the spear tip is has too many edges also, its pinching and is too sharp
compared to the spear tip where it is more smoother and no bevelling. The outer
rim from the middle and the bottom are too thin and sharp. There is no gradual
slope and it’s too sharp when there should be some roundness. The top also has
no gradual slope from the top of the spear tip to the middle. All in all, the
general shape is ok, but the rim and the groove do not look accurate to the
spear tip. What I should have done was break the model into 3 segments and
using different polygons for each segment. Also, instead of working in the
middle, I should have worked from the top down since the top requires more
edges then the middle and the bottom because the groove is sharp around the
outer edge.
Attempt 4
 As I said on my previous attempt, I will
separate the model into 4 segments because all look and flow differently. To
start with the top, I choose a cube because on the side of the model, its square
a little bit and the top looks like its sloping off, not rounded. I start
extruding down up to the point where its start to slope inward to the middle. I
wanted to focus on getting the shape first and worry about the groove later
because, the groove while it requires more edges, the shape of the model is
important. If the shape does not look like the spear tip, then I would need to
change some edges on both the model as well as the groove which may cause the
groove to distort.
As I said on my previous attempt, I will
separate the model into 4 segments because all look and flow differently. To
start with the top, I choose a cube because on the side of the model, its square
a little bit and the top looks like its sloping off, not rounded. I start
extruding down up to the point where its start to slope inward to the middle. I
wanted to focus on getting the shape first and worry about the groove later
because, the groove while it requires more edges, the shape of the model is
important. If the shape does not look like the spear tip, then I would need to
change some edges on both the model as well as the groove which may cause the
groove to distort. 
 For the middle part, I though instead of
getting another polygon, I can just continue extruding down because if I did
use a cylinder, I would have to bridge both component when I could have just
extruded down and change the position of the vertices as I go. This however
does not work on the bottom as I keep extruding because the spear tip on the
bottom flows different to the middle. So, I had to get a cylinder and rotated
it so the edges are angled and started extruding. I rotated the cylinder so the
topology looks better and also, so I don’t have a lot of edges around the base
of the spear tip. I then had to combine and bridge the two components and fix
the topology so it accurate to the spear tip model.
For the middle part, I though instead of
getting another polygon, I can just continue extruding down because if I did
use a cylinder, I would have to bridge both component when I could have just
extruded down and change the position of the vertices as I go. This however
does not work on the bottom as I keep extruding because the spear tip on the
bottom flows different to the middle. So, I had to get a cylinder and rotated
it so the edges are angled and started extruding. I rotated the cylinder so the
topology looks better and also, so I don’t have a lot of edges around the base
of the spear tip. I then had to combine and bridge the two components and fix
the topology so it accurate to the spear tip model. 
 Out of all 3 attempts, the last one is more
accurate. The only issue is that the rims are too soft and not sharp enough.
Also, on the side view of the model, the middle and bottom does not have a
small bevel compared to the spear tip. Furthermore, the top and middle do not
have the nice slope that slopes down and back up again in order to make the
rim. Similar to my last attempt, while the shape looks accurate, the detail
like the grooves and the rim need more work. I can still use the same method,
but I will start from the bottom and work my way up. I can just use this model
and make a few changes, but it would be much faster if I started on a new model
instead of wasting time trying to fix a small part of the model.
Out of all 3 attempts, the last one is more
accurate. The only issue is that the rims are too soft and not sharp enough.
Also, on the side view of the model, the middle and bottom does not have a
small bevel compared to the spear tip. Furthermore, the top and middle do not
have the nice slope that slopes down and back up again in order to make the
rim. Similar to my last attempt, while the shape looks accurate, the detail
like the grooves and the rim need more work. I can still use the same method,
but I will start from the bottom and work my way up. I can just use this model
and make a few changes, but it would be much faster if I started on a new model
instead of wasting time trying to fix a small part of the model.
In conclusion, while my first attempt was
able to make the shape on the front and the side using just a plane, it does not
show any depth or dimensional compared to my other 2 attempts and the spear
tip. My second attempt on the other hand was able to keep the 3D aspect of the
model, but living the other elements such as the rim, grooves and the topology of
the model does not look good. My third attempt similar to my second attempt it kept
the 3-Dimensional shape of the spear tip, but when it can to making the groove
and the rims, it was either too soft or too sharp. There were no slopes
presents on the rims and no bevelling between the middle and bottom of the
model spear tip. My last attempt however, while it uses a different method, had
a similar result to my second attempt. The rims this time where too soft and
the slope that starts from the top and works its way down the middle isn’t
presented very effectively.
Subscribe to:
Posts (Atom)